An Ariel bathroom vanity isn’t just a place to brush your teeth, it’s the anchor piece that sets the tone for the entire bathroom. Whether a homeowner is renovating a cramped half-bath or refreshing a master ensuite, selecting the right vanity can make the difference between a cramped, cluttered space and one that feels purposeful and organized. Ariel vanities combine contemporary design with functional storage, offering a range of styles and configurations to match different bathroom layouts and aesthetic preferences. This guide walks through what makes these vanities a solid choice, how to pick the right size and style, and what to expect during installation.
Table of Contents
ToggleKey Takeaways
- An Ariel bathroom vanity prioritizes solid plywood construction and moisture-resistant materials over cheaper particleboard, ensuring durability in humid bathroom environments.
- Choosing the right vanity size and storage configuration—such as stacked drawers or pull-out organizers—prevents clutter and maximizes functionality based on your actual needs.
- Ariel vanities offer both contemporary designs with clean lines and traditional styles with detailed molding, allowing you to match your bathroom’s aesthetic while maintaining quality construction.
- Proper installation requires securing the vanity to wall studs with wood screws and ensuring plumbing lines align with pre-drilled openings to avoid costly re-plumbing work.
- Using 100% silicone caulk and leveling the countertop front-to-back prevents water damage and mold growth, protecting your investment long-term.
What Makes Ariel Bathroom Vanities Stand Out
Ariel bathroom vanities earn their reputation by balancing form and function in ways many budget options skip. The brand focuses on solid construction, typically using plywood or engineered wood cores with quality veneers rather than particleboard that swells when exposed to bathroom humidity. This matters because bathrooms are brutal environments: steam, temperature swings, and water splash take a toll on cheaper materials within a couple of years.
The hardware on Ariel vanities tends to be functional and durable. Soft-close drawers and doors with quality hinges reduce that annoying slam and last through thousands of open-close cycles. The countertop options, whether cultured marble, solid surface, or ceramic tile, are designed to stand up to daily moisture without warping or staining easily. When you open a vanity drawer, you’ll notice thoughtful organization: divided compartments, adjustable shelving, or pull-out trays that actually use the interior space rather than turning it into a dead zone. Many models also come pre-drilled for standard faucet configurations, which saves time if you’re coordinating plumbing and are already familiar with your preferred setup. The cabinet bottoms are finished and sealed, not left raw, which prevents water damage from spills or cleaning splashes. These details add cost upfront but prevent the frustration of a cabinet degrading after a few years.
Design Styles and Aesthetic Options
Contemporary and Modern Designs
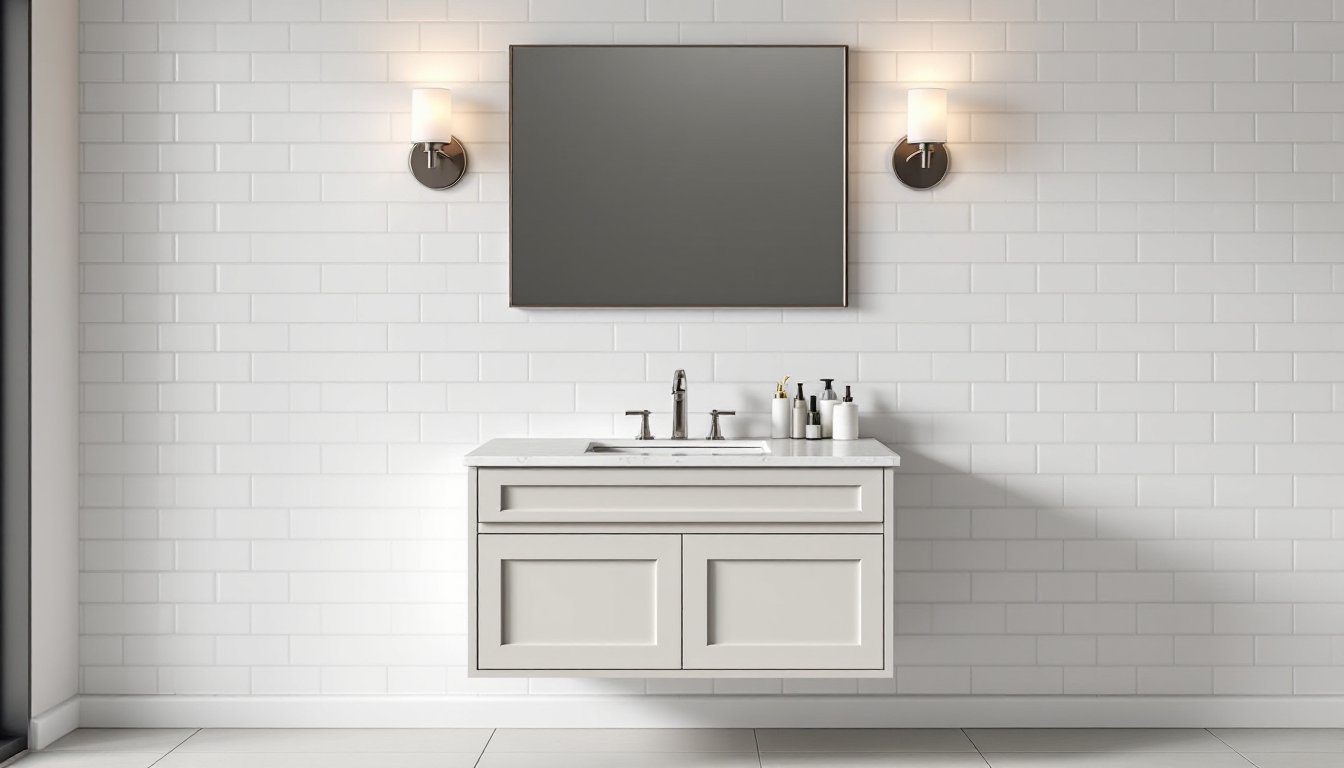
If a homeowner is drawn to clean lines and minimal ornamentation, Ariel’s contemporary collection delivers. These vanities typically feature flat-panel doors with minimal molding, horizontal grain patterns, and hardware that’s subtle and integrated into the overall form. Colors lean toward soft whites, grays, warm taupes, and natural wood tones, finishes that feel fresh without trending hard in one direction. The countertops often pair with integrated sinks or sit-on bowl designs that let the cabinet itself be the visual focus. Lighting matters here: sleek vanities pair well with modern sconces or a backlit mirror. The vanities work well in bathrooms with minimal decoration, letting the vanity’s proportions and material quality shine. Most contemporary Ariel models come in widths from 24 to 72 inches, so even smaller bathrooms can find a clean-lined option that doesn’t feel forced.
Traditional and Transitional Styles
For those favoring raised panels, turned legs, or decorative crown molding, Ariel’s traditional and transitional lines offer detail without excess. Transitional styles split the difference, think shaker-style doors with slightly refined hardware and tapered legs instead of a full pedestal base. Wood finishes in cherry, espresso, or aged white evoke established bathrooms that feel timeless rather than trendy. These vanities handle ornate mirrors, vintage fixtures, and patterned tile backsplashes. A traditional Ariel vanity often includes a matching mirror frame or options for coordinated backsplash trim, creating a cohesive look. If a homeowner gravitates toward fabric textures, aged metals, and layered décor, a traditional Ariel vanity gives the cabinet presence to anchor those choices. The wider drawers and deeper cabinets in these models also maximize storage, which justifies the slightly heavier aesthetic.
Size and Storage Configuration Guide
Picking the right vanity size is non-negotiable, it makes or breaks how the bathroom functions. Start by measuring the wall where the vanity will go, including the space from wall corners to any doors or windows. A standard single-sink vanity runs 24 to 36 inches wide, which fits most bathrooms but stores less than many people need. Double-sink Ariel vanities span 48 to 72 inches and suit shared bathrooms or larger master baths where two people get ready simultaneously. The depth is typically 21 to 22 inches (the standard that allows a faucet and someone to lean over without hitting the wall), though some wall-hung models drop to 18 inches to conserve space.
Storage configuration matters as much as width. Vanities with a single shallow drawer above cabinet doors waste interior space, that under-sink area becomes one dark cavity. Better designs include two or three drawers stacked above a cabinet, or a cabinet with interior pull-out drawers that capture otherwise-wasted space. If bathroom clutter is a real problem, look for Ariel models with divided top drawers for cosmetics, lotions, and grooming tools. Shelf depth varies too: some cabinets include a full-depth shelf across the middle, others have adjustable shelves, and some have open-bottom designs if plumbing will sit in that space. Take a ruthless inventory of what needs storage, towel rolls, hair tools, medications, cleaning supplies, and match it to the cabinet’s actual compartments, not just overall volume. A 48-inch double-sink vanity with two large drawers and two cabinet doors stores far more usefully than a 60-inch vanity with only one big hollow cavity below.
Material Quality and Durability Considerations
Ariel vanities use several material strategies, and understanding them prevents disappointment. Plywood and engineered wood are the backbone: real plywood is much stronger and moisture-resistant than MDF (medium-density fiberboard) or particleboard, which swell and fail when exposed to humidity over time. Confirm the cabinet is plywood, not a cheaper composite, especially in steam-prone bathrooms. The exterior finish might be a laminate, veneer, or painted surface. Veneers on plywood hold up better than veneer on particleboard because the core won’t expand and contract enough to crack the veneer. Paint-grade vanities (typically white or gray) hide the wood and give a seamless look: verify the paint is bathroom-grade (moisture and mildew-resistant) rather than standard wall paint.
Countertop material is a long-term choice. Cultured marble (a composite of marble dust and resin) is affordable and mimics real marble but scratches and stains if not sealed properly. Solid surface material (like Corian) is non-porous, durable, and repairable if scratched, but costs more. Ceramic tile or porcelain looks rich and handles moisture well, though grout lines collect mold if not maintained. Real stone (granite or marble) is beautiful but porous and requires regular sealing. Hardware hinges and drawer slides should close smoothly and silently, look for full-extension ball-bearing slides (not cheap plastic tracks) and hinges with adjustable tension. Check if the vanity includes a warranty on the cabinet and finish: two to five years is typical. Warranty coverage tells you the manufacturer stands behind durability.
Installation and Compatibility Tips
Installing an Ariel bathroom vanity is a manageable DIY project if plumbing isn’t involved, but respect the complexity. First: measure the wall studs behind the cabinet location using a stud finder. Vanities must be secured to wall studs with 2.5-inch wood screws through the mounting brackets or back panel, drywall alone won’t hold the weight and water exposure. Mark the stud centers, then pre-drill to prevent splitting. If studs don’t align with the cabinet’s factory mounting holes, use a backing board (2×8 or 2×10 lumber screwed horizontally between studs) at the height where the cabinet will mount.
Plumbing compatibility requires honesty: if drain or supply lines don’t match the vanity’s pre-drilled openings, you’ll need a plumber. Ariel vanities come pre-drilled for standard 4-inch center faucet holes or single-hole configurations: if your sink basin needs a different spacing, repositioning those holes is tricky and voids the warranty. Supply lines can usually be rerouted, but if the drain doesn’t sit over the existing trap, you’re looking at re-plumbing the wall, a licensed job in most jurisdictions. Check local building codes: some areas require a licensed plumber to do any drain work, even moving a trap laterally. Verify the vanity’s outlet or backsplash opening and ensure it doesn’t block electrical outlets or interfere with mirrors or sconces you plan to install above.
Caulk the seams where the vanity meets the wall with 100% silicone caulk, not paintable caulk, it flexes and resists mold better. If installing a tile backsplash, do that before the vanity goes in, or carefully caulk around the vanity afterward. Let caulk cure 24 hours before exposing it to splashing water. Finally, confirm the vanity’s countertop is level front-to-back and side-to-side: use shims under the base if necessary. Water will pool on an unlevel countertop and seep into the cabinet.