A 54 inch bathroom vanity strikes the sweet spot for most medium-to-large bathrooms. It’s wide enough to feel functional without dominating the space, and it offers genuine storage without cramping the room’s workflow. Whether upgrading an aging vanity or planning a bathroom remodel, understanding what a 54 inch vanity brings to the table, and what it actually needs to fit, makes the difference between a smooth installation and a costly surprise. This guide walks through the essentials: what defines this size, who it works best for, the styles and materials available, and practical tips for choosing and installing one.
Table of Contents
ToggleKey Takeaways
- A 54 inch bathroom vanity offers the ideal balance between functionality and space efficiency for most medium-to-large bathrooms, fitting rooms at least 5 feet wide and 8 feet long.
- 54 inch vanities typically measure 30–36 inches tall and 20–22 inches deep, with depth directly affecting under-sink storage capacity and plumbing accessibility.
- Material and finish choices significantly impact durability: invest in polyurethane or catalyzed lacquer finishes on solid wood or plywood for daily-use bathrooms, and choose stainless steel or brass hardware over cheap pot-metal in humid environments.
- Budget realistically between $400–$700 for entry-level 54 inch vanities and $1,000–$1,800 for mid-range units with quality countertops, plus $500–$1,200 for professional installation and plumbing work.
- Proper installation requires mounting the 54 inch vanity to wall studs with 2½-inch wood screws, ensuring level placement, and sealing all seams with paintable silicone caulk to prevent water damage.
- Regular maintenance—wiping spills immediately, monthly leak checks, and annual sealing of wood surfaces—extends your vanity’s lifespan and prevents mold and water damage.
What Is A 54 Inch Bathroom Vanity?
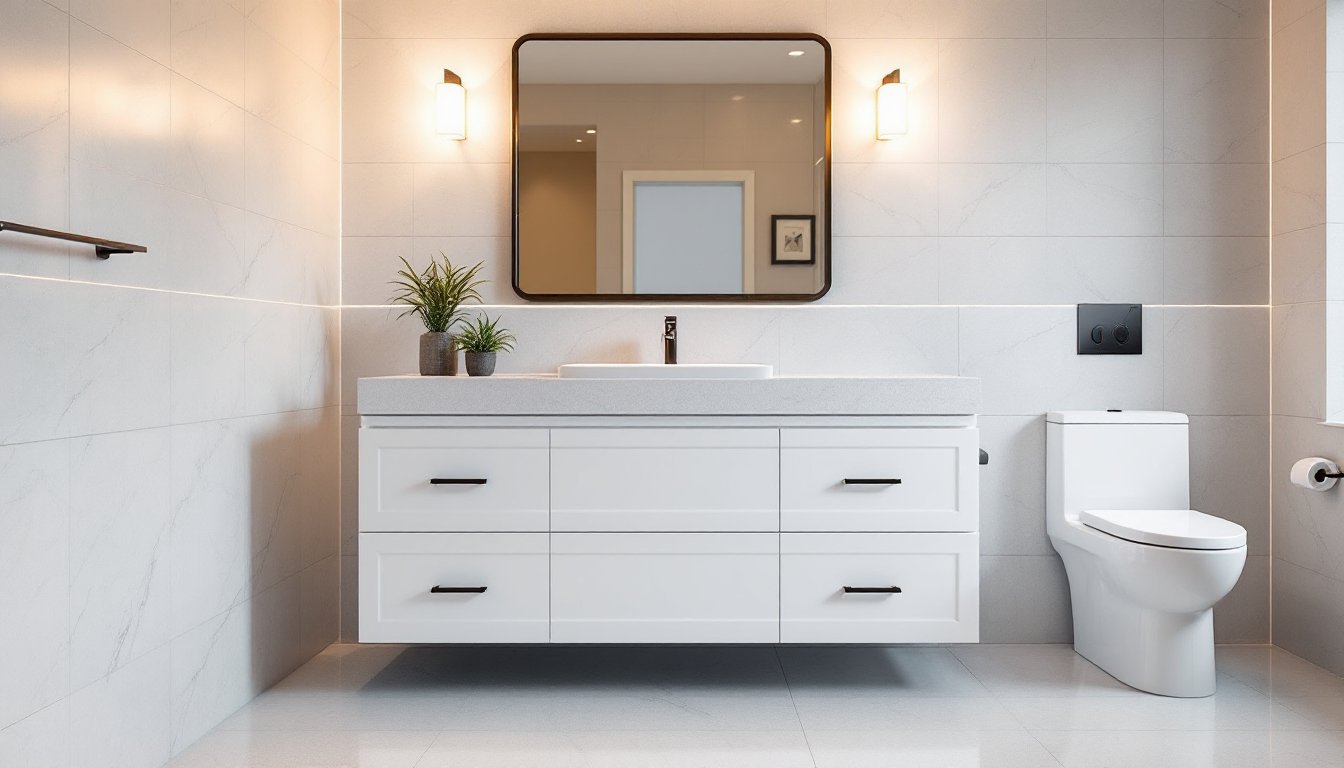
A 54 inch bathroom vanity is a wall-mounted or freestanding cabinet that measures 54 inches wide (wall-to-wall at the widest point). Most standard 54 inch vanities are between 30 and 36 inches tall and 20 to 22 inches deep, dimensions that align with typical plumbing rough-ins and allow for comfortable countertop clearance from the wall.
These vanities typically come as single-sink units (one large basin) or double-sink configurations, though the 54 inch size leans more commonly toward single-sink designs. A 54 inch bathroom vanity with sink usually includes the cabinet, countertop, and pre-cut or drilled sink opening. Some arrive pre-assembled: others require on-site assembly.
Don’t confuse width with functionality. The actual usable cabinet space depends on the wall thickness, back splash height, and whether the design features open shelves or closed drawers. A shallow vanity at 18 inches deep saves floor space but limits under-sink storage, while a full 22-inch depth gives you room for plumbing runs and supplies.
Key Benefits And Space Considerations
A 54 inch vanity hits a practical middle ground. It’s larger than compact 30-inch models (which feel cramped for two people sharing a morning routine), but it doesn’t consume the wall space a 60-inch or 72-inch double-sink unit demands. For most single-bath or guest-bath renovations, 54 inches offers ample counter workspace and storage without overcommitting the room’s square footage.
The width also accommodates standard faucet spacing (typically 4 or 8 inches center-to-center for widespread faucets) without looking cramped. Task lighting and mirrors scale well at this width, and you’ll have room for soap dispensers, toothbrush holders, and small décor without cluttering the countertop.
One trade-off: a single-sink 54 inch vanity leaves less counter elbow-room than a double-sink unit of equal width. If multiple people use the bathroom simultaneously, consider this when evaluating layout.
Ideal Room Dimensions And Layout
A 54 inch bathroom vanity works best in bathrooms at least 5 feet wide and 8 feet long (40 square feet minimum). This spacing allows clearance for the vanity cabinet, a toilet 18 to 24 inches away (per standard code), and a shower or tub opposite.
Measure your wall accurately: wall studs, electrical outlets, and plumbing lines may require relocation. If your planned vanity wall has a stud at 54 inches, you’ll need to frame around it or choose a different location, most vanities are designed to mount between studs, typically 16 inches on-center.
Check your rough plumbing height. Supply lines typically enter at 20 to 24 inches above the floor: drain lines sit 18 to 20 inches high. A vanity that forces you to relocate plumbing can add $300 to $800 in labor costs, so confirm these points before purchasing.
Popular Styles And Design Options
Modern, transitional, farmhouse, and contemporary designs all ship in 54 inch widths. Modern vanities feature clean lines, glossy or matte finishes, and minimal hardware. Farmhouse-style units often include beadboard panels, barn-door accents, or distressed wood finishes. Transitional designs blend traditional legs or turned feet with simpler profile details, a safe choice for resale appeal.
Materials vary widely. Solid wood (oak, maple, cherry) provides durability but requires regular sealing. Plywood-based cabinets with veneer cost less and resist moisture better if properly finished. MDF (medium-density fiberboard) is budget-friendly but less water-resistant: use it only in vanities rated for bathroom use with a protective topcoat.
Countertops come in engineered stone (quartz), natural stone (granite, marble), cultured marble, or laminate. Quartz and granite resist stains and require minimal maintenance. Marble looks elegant but scratches and etches easily: weigh aesthetics against your household’s tolerance for imperfection. Cultured marble (polyester resin with stone chips) offers quartz-like durability at lower cost but can yellow over time.
Materials, Finishes, And Color Choices
White and gray vanities dominate current trends, but black, navy, and natural wood tones hold steady for their versatility. Light colors expand visual space in tight bathrooms: dark tones anchor larger rooms and hide water spots and dust.
For finish durability, request factory-applied polyurethane or catalyzed lacquer on wood surfaces, both resist humidity better than standard stain alone. If sourcing a vanity locally, inspect the cabinet interior and underside. Poor sealing in hidden areas invites mold and rot within 3 to 5 years.
Matte hardware (brushed nickel, matte black) pairs well with modern and farmhouse styles, while polished chrome suits traditional designs. Avoid cheap pot-metal hardware: it corrodes quickly in humid bathrooms. Stainless steel and solid brass stand up longest.
How To Choose The Right Vanity For Your Needs
Start with your actual usage. A guest bath used twice a month can tolerate MDF and cultured marble. A family bathroom sees daily wear: invest in solid wood or plywood with polyurethane finish and quartz or granite top.
Measure twice: width of the wall (or alcove), distance from adjacent walls, height of existing outlets and plumbing lines, and ceiling clearance for mirror installation. Bring these measurements when shopping: many retailers can confirm fit on the spot.
Set a realistic budget. Entry-level 54 inch vanities (vanity only, no top or sink) run $400 to $700. Mid-range units with a quality top and integrated sink cost $1,000 to $1,800. Premium hardwood or designer finishes exceed $2,000. Add $500 to $1,200 for professional installation, plumbing relocation, and wall prep if needed.
Read return policies carefully. Some sellers offer 30-day returns: others are final sale. Confirm water-damage coverage and what constitutes a defect. Order samples or visit showrooms in person if possible, photos online don’t capture finish quality or depth of color.
Installation And Maintenance Tips
Installation begins with wall prep. Locate studs using a stud finder and mark the mounting rails (usually two horizontal rails that secure the cabinet). Turn off water supply at the shutoff valve. Disconnect and cap existing plumbing if replacing an old vanity.
Mount the vanity on studs using 2½-inch wood screws or lag bolts rated for bathroom cabinets: drywall anchors alone aren’t sufficient, as the weight and daily use will stress the wall. Check level in both directions with a spirit level. Shim as needed to ensure the vanity sits perfectly level, a sloped surface causes water to pool and shortens the countertop’s life.
Reconnect supply lines (use braided stainless or PEX, not corroded old copper if possible) and run the drain to existing P-trap. Use plumber’s putty or silicone caulk around the sink rim to prevent water from seeping under the countertop. Caulk the back seam where the vanity meets the wall with paintable silicone, not regular caulk, which deteriorates in moisture.
Maintenance is straightforward. Wipe spills immediately, especially on marble or wood. Dust with a dry cloth weekly: use a slightly damp cloth for deeper cleaning. Avoid abrasive scrubbers or acidic cleaners on natural stone. Seal wooden surfaces annually with a water-repellent finish. Check under the sink monthly for leaks around supply connections: tighten any loose fittings with a wrench.